 Mt Whitney's Mountaineer's Route is the second most popular route up Mt Whitney. The climbing line takes you up a steep couloir that separates the northeast ridge from the east buttress of Mt Whitney. The route is rated class 3 because of the section from the notch to the summit.
 Most of the elevation is gained by using the typically snow filled gully that leads from Iceberg Lake to the above exit notch (see photos below). Early season is the best time to climb the Mountaineer's Route due to the fact, that the more snow and ice that fills the gully, the better. Loose talus and scree are not only a whole lot more work to ascend, but all that loose stuff, makes it much more dangerous, due to the potential rockfall throughout the steep gully. Rockfall is usually triggered by climbers higher up on the climb. The Route was first climbed by John Muir who went up solo on October 21, 1873.
By far the easiest approach to the Mountaineer's Route is by taking the North Fork of Lone Pine Creek. You start out on the Main Mt Whitney Trail, but after about 0.8 miles, you will see a cut off sign where you turn north onto the trail going up the North Fork of Lone Pine Creek (as shown in the above left photo). (as shown in the above photo).
There are multiple camping opportunities such as Lower Boy Scout Lake, Upper Boy Scout Lake, and finally Iceberg Lake which is located at the base of the route. Most people make use of Iceberg Lake as a campsite for easy access to all the Mt Whitney East Face Routes (including the Mountaineer's Route) if they are planning a climb that involves more than one day.
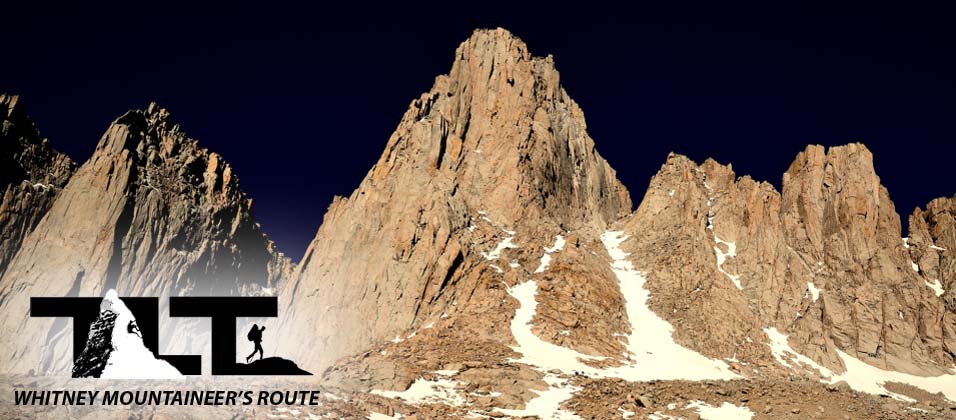
 In the image to the right above you see the Mt Whitney group in early morning light known as "alpenglow" This is the most beautiful time of day for viewing and taking photos of Mt Whitney. Mt Whitney is the highest peak as seen in the right hand portion of the photo. Then working to the left of Mt Whitney we have Keeler, Crooks, and Third needle.
I took the photo shown here, as we were working our way up to Iceberg Lake at 6:43AM Sunday morning on May 27th 2014. You may wonder how I remember this, but the fact is I would never remember something like this, but thank goodness, my camera records all these little bits of information.
PERMITS:
Permits are required for both overnight stays and day use when doing any of Mt Whitney's East Face Routes, and this includes the Mountaineer's Route. As mentioned above, most climbers use the North Fork of Lone Pine Creek for access. You enter the Whitney Zone on the North Fork of Lone Pine Creek, just a bit above Lower Boy Scout Lake. Getting a permit in advance in this zone costs $15.00 per person and an additional $6.00 charge for the group. Securing a permit for the North Fork of Lone Pine Creek is not quite as difficult as getting a permit for the Whitney Trail, but it is still very difficult to obtain a permit when compared to other areas of the Sierra Nevada. It has a very low quota of only 10 people for overnight trips and is part of the 100 person per day quota for the entire Whitney Zone Area. Permits for the North Fork of Lone Pine Creek are not part of the Lottery so you can pick one up at any time as long as there is availability. Check out following link for getting a permit for the North Fork of Lone Pine Creek
 After hiking up the North Fork, we finally get to where the real adventure begins. In the image to the left you can see Iceberg lake in the background, and my son Sean and my long time climbing partner Mike getting ready to ascend the snow and ice filled chute by putting on their crampons.
On this trip, we camped a mile or so down the trail and used the lake area only for getting ready for the climb up the snow and ice couloir that leads to the notch and then to the summit of Mt Whitney.
Iceberg Lake is at an elevation of 12,621 feet and is frozen for most of the year. Iceberg Lake is used as the traditional high camp for climbers doing East Face Routes on Mt Whitney. Using Iceberg Lake for a high camp will give you a great start in the morning and will greatly increase your chances for success on making the summit.
FYI
It used to be that you could drink the water right out of the lake with no concerns, but today with so many climbers using the lake area for camping, it is a very good idea if you treat or filter all your drinking water that you obtain from the lake. For much more on the subject of water, please visit our page on Water/Dehydration.
 Above you see the Mountaineer's Route from two different vantage points. The image to the left shows you the route from the air and the one on the right shows you the route from the ground. It's amazing how you get such a different perspective of the route when viewed from differing camera angles. The view from the air makes the angle of the route look almost vertical, and the one from the ground looks like a very gentle angle. The reality once you are on the route is somewhere in the middle. I would say that the slope is about 35 degrees which is about the same angle as Mt Shasta's Avalanche Gulch Route.
 In the photo to the left, above, you can check out the angle of the slope from a climbers point of view at the the three quarters point up the gully that leads to the notch. We did not find the slope too intimidating, and if you have crampons and ice ax, you should be able to safely ascend the snow and ice that is usually present in early season.
I have always found that gaining elevation on snow and ice using crampons and ice ax to be much easier than fighting loose rock and talus. This is why it is generally agreed upon by most Climbers, that early season ascents on the Mountaineer's Route are best. In the later summer months, the route turns into a nasty loose talus and scree climb.
At this point in the climb, altitude plays a serious role in forward progress, and I found myself taking about a dozen steps at a time, then stopping and resting until I got my breathing under control. I also found myself drinking a lot of fluid due to water loss from both breathing and from sweating. Mike as shown in the photo below was just wearing a long sleeve shirt, but I did not bother to adjust my clothing to eliminate perspiring, and paid a big price by running out of water later in the day. Proper regulation of clothing is very important in order to minimize water loss due to sweating while mountaineering or during any other intense activity. You will perform better, and will be able to make far better use of your water supply.
 Once we reached the top of the snow section, as it was presented to us on June 1st, 2014, we had to do a short scramble to the Notch that marks the top of the couloir on the Mountaineer's Route. I would rate this part of the climb as class 2, but I know there are others who would rate it as class 3. This is why every climber needs to make his or her own determination as to what they are comfortable with. We took a rope along, but did not use it at this point of the climb.
Once you reach the Notch at the 14,150 foot level, you will have about 350 vertical feet to go to reach the summit. In a good snow year, this part of the climb would be covered in snow, and you could continue to use your ice ax and crampons to gain the notch. This is why I would recommend early season. Always nice to get as high as possible on the snow and ice without having to resort to scrambling on loose rock. Also there is a much greater danger of one of your climbing partners kicking a rock loose that may end up cascading down on you or on a climbing party below. Rockfall at this point has the potential of cascading many hundreds of feet down the gully, or even to the bottom with incredible speeds.
 Here is where things got a bit interesting. Once past the notch, you will encountered some real climbing. In the image to the left, above, you can see my son Sean below on belay with Mike up above belaying him. Mike and myself took a route well to the right of what you see in the image and I would rate the section that we went up no more than class 3.
The climbing that you see Sean taking on in the left hand photo was definitely class 4 along with a few class 5 moves. This was certainly worth taking the rope out for. Once Sean reached Mike as you will see in the photo below, it was a short scramble to the summit plateau and thus the summit.
If you are unfamiliar with the Yosemite decimal system of rating climbs, you can visit our page on Climbing to get some more information on the subject. There is no doubt that ascending Mt Whitney via the Mountaineer's Route is a big step up from the Mt Whitney Trail.
One thing we later discussed is how important it is to have the rope in possession of the person who is in the lead when going up, and to have the rope in the possession of the person following up when going down. This way, the rope is always available to any individual who may be having difficulty. If you reverse this logic, then you will quickly find out how hard it is (or sometimes impossible for that matter) for you or someone in your climbing party to throw the rope to someone above you on a climb.
 In the above aerial photo (all aerial photos on Timberline Trails are taken from my climbing partner Mike's Ultra Lightweight Aircraft) you can clearly see the Mountaineer's Notch that leads to the upper slopes of Mt Whitney's North Face where you will complete your climb to the Summit of Mt Whitney via the Mountaineer's Route. The green line shows the class 4-5 ending that Sean took as described in the above text. The yellow line shows the class three ending that myself and Mike took. I also included the blue line to show the traverse that other climbers take that is rated class two. Less direct as you can see, but if you are uncomfortable with class three climbing, that could be an option for you.
 After ascending the section, as shown in the image above, Sean makes a short scramble in order to reach the summit plateau while Mike re-coils the rope. During this time, I was able to gain the summit plateau just a bit ahead of Mike and Sean so that I could take the photo to the right.
Note the arrow showing the tower that marks the exit point for the Mountaineer's Route that lies just above the Notch as seen in one of the photos above. This is important so you can get your bearings when going down.
We did not use the Mountaineer's Route for our descent which was a big mistake, but used the North Slope of Mt Whitney for our descent. This took way longer, and ended up being much harder. More about this later in the writeup. But for now, it is important to make a mental note so that you can stay on route later on when you make your descent. You do not want to end up descended the peak in the wrong place and getting into trouble by having to climb down a section that is beyond your climbing abilities.
 Well here we are, finally on the summit. It is alway so cool to come over the crest and see the summit shelter from a different vantage point then from the trail. I remember when Mike and I climbed the East Face Route. When we took our last step up on the Giant Staircase section of the route, we were presented with the summit shelter directly in front of us. That was really exciting.
In the image to your left, you see Mike signing the Summit Register with Sean in the background checking his GPS for info on location and such. Sean likes to keep track of way points and other bits of information.
I have been on the Summit of Mt Whitney many times, but I have to say that doing East Face Routes are always very exciting and memorable. But this is not to say that taking the Mount Whitney Trail is not memorable or exciting, because it is. It's just to say that the East Face Routes give you views and challenges that take you off the beaten path and give you a degree of solitude that you don't get on the trail. The other thing is that the photo opportunities for taking images of Mt Whitney and its neighboring needles are second to none when you are below camping at Iceberg Lake or in the near vicinity. The early morning alpenglow and grandeur of Mt Whitney is something to behold. I have taken some cool photos with a telephoto lens of the group from Lone Pine, but the photographs cannot compare to the ones I have taken up close from Iceberg Lake and the surrounding areas. You can also get some spectacular photos of Mt Russell too.
 Instead of going back down the Mountaineer's Route, we descended the North Face of Mt Whitney. Big mistake, because it took way longer and was much more complicated than just descending back down the way we came up.
As you can see in the aerial photo to the right, the North Face of Whitney is quite a maze. If you pick the correct route, you can probably make a class two or possibly class 3 climb or descent without any problem. If you get off course you could easily find yourself on class four or five terrain.
The green and blue lines show our descent. We had a rope along with us, so we rappelled the blue section to save some time and danger. Lots and lots of loose rock so you will be working hard no matter which way you go. My climbing partner Mike and I descended the North Slope years ago after summiting Mt Whitney via the East Face Route. We were over 30+ years younger then, and I have to say that youth makes a huge difference! After experiencing going up the Mountaineer's Route and going down the North Face, next time (if we ever do another East Face Route), we will most definitely go down the Mountaineer's Route.
 After reaching the bottom of Mt Whitney's North Face, we traversed over and slightly up into the Whitney/Russell Pass as shown in the left-hand image. It is important that you exit via the Whitney/Russell Pass if you are camped in the Iceberg Lake area, otherwise you are in for some hard work getting back on course. In the right-hand photo, you see Sean taking a breather at the top of the pass, with Iceberg Lake below. From the pass, it is an easy descent down to the Lake. From there, you can pick up the North Fork trail again and hike back down to Whitney Portal.
Well, that's about it for Mt Whitney's Mountaineer's Route. So at this point, click on the link below and jump back to the top and check out some of the other links for more adventure on Mt Whitney. Email Sign Up

| Join the Adventure! Sign up here for Timberline Trails Monthly Newsletter |

Join us on Instagram
©2006-2026 TimberlineTrails. All Rights Reserved.
....